

Blog and manage static web pages more effectively


Writing a technical blog is one of the most important tasks for developers today, but it has never been easy to implement a low-cost and high-efficiency website for programmers who have less experience in front-end technologies.
Blogging with static web pages
A static web page is a web page that delivers the content stored in the server, which is different from a dynamic website that can be generated by a web application. However, static page is complicated to reuse layout structure or the styling of the page.
That is why static site generators were introduced. With this blog engine, it can generate the pages for us automatically, the rest for us is to focus on the blog and writing content.
One of the most popular static site generators is Jekyll, which is how Pixel Carrot is built. It has a large supportive community with a variety of plugins and theme styles.
In this article, we will see how to maintain static pages and the ability to manage them anywhere with just a browser and an internet connection.
Hosting static websites on Firebase
Firebase Hosting is provided by Google, which is SSD-backed around the globe which enable it to deliver web content fast. It also supports HTTPS and provides free certificates for custom domains, with a free 10GB transfer per month is fancy enough for our technical blogs.
Setup and install Firebase CLI
The first thing is to install the Firebase CLI, which is a command-line tool that allows us to deploy our blog to the Firebase. This may be a drawback since there is no user interface to manage, but this is not a problem for developers. In the next discussion section, we don't even need to run the deployment command.
To get the Firebase CLI, it is required the Node environment to install via npm with the following command.
npm install -g firebase-tools
Once it is done, we have to authenticate with the following command.
firebase login
It will prompt the browser to authenticate with Google. After that, we can run the firebase command on the local machine.
Upload static pages to Firebase
I have prepared a JSON configuration, which must be placed at the root directory of the project. By default, Jekyll generates the static pages into the _site folder, so we have to specify it to the public field that will allow Firebase to look up the root index.html of your page.
When visiting production pages, we will see a .html suffix in the URL. It looks ugly and is not SEO friendly. Luckily, we can remove it by simply combining enabled the cleanUrls field and disable trailingSlash in the JSON configuration.
{
  "hosting": {
    "public": "_site",
    "ignore": [
      "README.md",
      "firebase.json",
      "**/.*",
      "**/node_modules/**"
    ],
    "cleanUrls": true,
    "trailingSlash": false,
    "rewrites": [
      {
        "source": "**",
        "destination": "/404/index.html",
        "type": 404
      }
    ]
  }
}
With this configuration, we can deploy generated contents from Jekyll to the Firebase Hosting by running the following command.
firebase deploy -m "Hello World" --project pixel-carrot-e4c87
Continuous deployment with GitLab CI
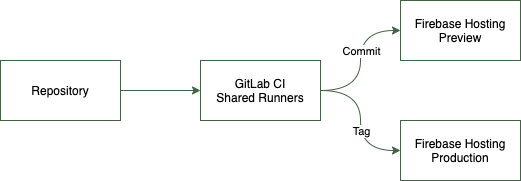
In the previous section, we learned how to deploy static contents to Firebase from a local machine. More than that, we can delegate the compiling works to the server. In this section, we will apply GitLab CI to the git repository, which allows installing environment variables on a shared and secure cloud machine to generate static pages then deploy it to the Firebase Hosting.
Firebase Token
Running deployment command in a cloud machine requires access to Firebase Hosting automatically. It means we have to provide a long-term deployment key, which can be generated with the following command.
firebase login:ci
With this token, it can run the deployment anywhere, so it should be kept in a secure place. We can run the deployment on our local machine with the following command. We can see the difference is that the token argument allows to input the token and the non-interactive argument prevents blocking for user input during execution.
firebase deploy -m "Hello World" --project pixel-carrot-e4c87 --non-interactive --token FIREBASE_TOKEN
GitLab Variables
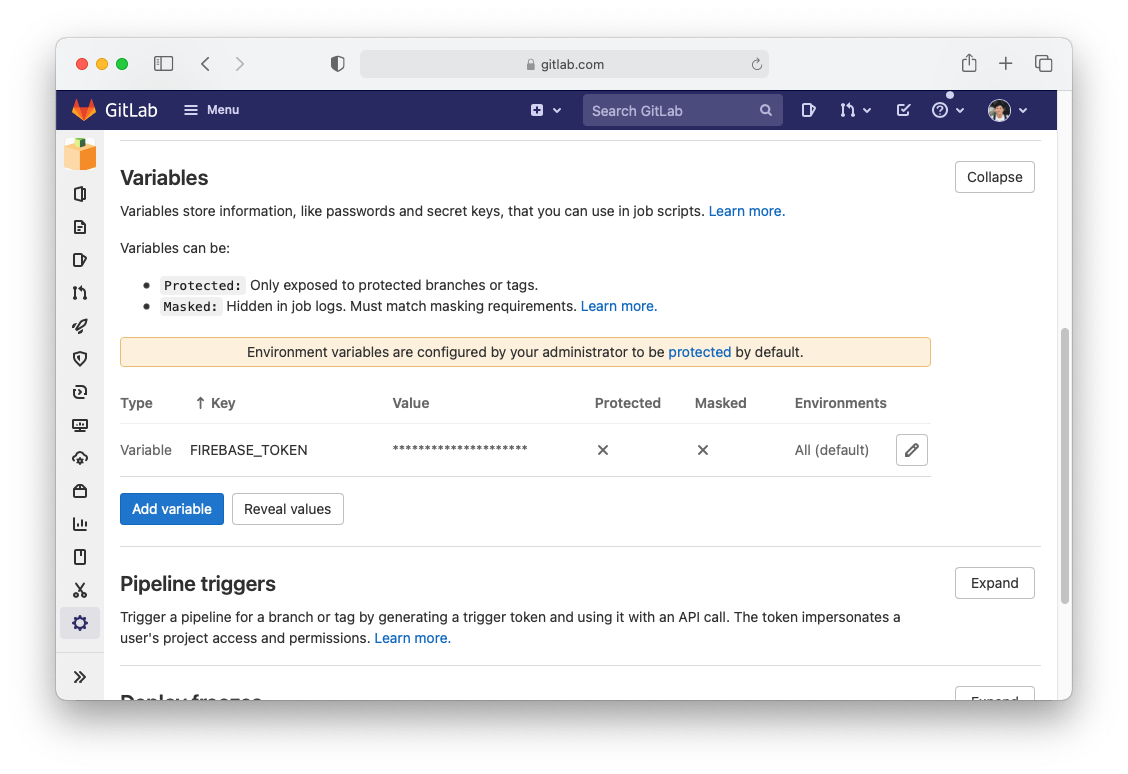
In this topic, we apply the GitLab CI to run the deployment task. To prepare for this we need to configure the FIREBASE_TOKEN key variable in the CI settings. It is accessible from this path Settings > CI/CD > Variables.
CI/CD configuration
Technically, the cloud machine will pull a docker image with presets environment likes: Ruby or Node. We need both of them to install Jekyll and Firebase CLI, however, there is no official image support for both types, so I found an alternative image from SMIKINO, which can provide both.
To enable GitLab CI, we just need to add a .gitlab-ci.yml file to the root directory of the project. This is the configuration of the Pixel Carrot page, which can be copied and simply reused by replacing the project ID argument.
image: smikino/ruby-node:2-10
variables:
  JEKYLL_ENV: production

deploy:
  stage: deploy
  only:
    - tags
  before_script:
    - bundle install
    - npm install -g firebase-tools
  script:
    - bundle exec jekyll build
    - firebase deploy -m "Pipeline $CI_PIPELINE_ID, build $CI_BUILD_ID" --project pixel-carrot-e4c87 --non-interactive --token $FIREBASE_TOKEN

dev:
  stage: deploy
  before_script:
    - bundle install
    - npm install -g firebase-tools
  script:
    - bundle exec jekyll build
    - firebase hosting:channel:deploy preview --project pixel-carrot-e4c87 --non-interactive --token $FIREBASE_TOKEN
Similar to a local machine, it will install Jekyll and Firebase CLI every time the task is triggered. With this configuration, when it receives a committed change, the new content will be delivered to a preview environment on Firebase, so that we can preview its appearance look before making any changes to the production website. Notice that the production task only run when making a release tag commit.
Conclusion
Setting a CI for a Jekyll page can be useful that allows editing and adding blog content from anywhere by using the built-in Web IDE. Unlike Github Pages which only offer free to public repositories, Hosting a blog on Firebase is free with HTTPS supported, so the only cost is to maintain the domain.